Friday, January 28, 2011

DeepEnd a jailbreak tweak to make your iPhone goes 3D.

DeepEnd is from a staple in the jailbreak app community, and one of our favorite developers, Ryan Petrich — the same guy behind ActionMenu.


Want to see how DeepEnd works in action? Check out our video inside as we explore this nifty looking jailbreak tweak…


At stock settings, the effect, while present, isn’t as pronounced as one might expect; but that’s nothing a quick adjustment of the Zoom, Pitch, and Roll in the settings section of the Settings.app won’t remedy.


All in all, DeepEnd is a pretty good jailbreak tweak; it does exactly what it says it does, and on top of that it’s free on Cydia for jailbroken iPhones on Ryan’s repo. Just add: http://rpetri.ch/repo/ to your ‘Sources’ in Cydia via the ‘Manage’ tab. iPhone 4 only.

Monday, January 24, 2011

[How to] Get Cydia ThemeIt ( Cydia New Theme Store)

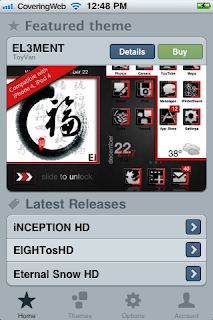
Cydia added a new feature yesterday to bring Theme Center which includes all popular themes for your iPhone but Today Theme It is available as a Cydia package for jailbroken iOS device. Theme It comes with a clean, easy-to-use interface and quite few themes. Let's see how to install it.


STEP 1: You need a jailbroken device to perform this guide, you can use our guide posted here to jailbreak your iOS 4.2.1 device using Redsn0w.


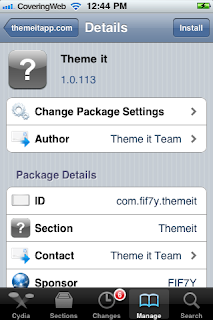
STEP 2: Open Cydia, tap on Manage, then Source, edit and add the below repository source as shown in the screenshot below:


http://www.themeitapp.com/repo


STEP 3: Return back, navigate to the source and install Theme It app as shown below:


STEP 4: That's it, now you'll get Theme It on your home screen, launch it and have fun !


[How to] Put Custom Ringtone and SMS Notification into your iPhone

Following up on the earlier iPhone hacks is customizing the most common audio: ringtone and SMS notification. Apple has locked down custom ringtones and profit from them. The biggest problem is, their selection is scarce and sucks. Here’s a simple guide on how to upload the Ringtones:
  1. Choose an MP3 file and trim it to 30 seconds or less – I use Audacity (download link) to do it
  2. Import that MP3 into iTunes
  3. Goto iTunes -> Preferences (for Mac) or Edit -> Preferences (for PC)
  4. Navigate to Advanced -> Importing tab and set the “Import Using:” to AAC
  5. Find the trimmed MP3 file inside iTunes, right click and choose “Convert Selection to AAC”
  6. Right click the AAC version of the file and choose “Get Info”
  7. Note the path to the file as indicated by the “Where” section under the “Summary” tab
  8. Navigate to the location of the file and copy it to desktop
  9. Change the extension of the copied file to “.m4r”
  10. Open the files in iTunes and it should be automatically inserted under Ringtones category, which then can be transferred to iPhone
NOTE: I have tried to use “SoundConverter” and set the file type to be m4a. This actually doesn’t work. When I did it that way, the file will be uploaded but won’t be able to be played. It might have something to do with the file size generated by “SoundConverter” being too large.
SMS Notification is slightly more complicated than the Ringtones counterpart. SMS notification actually can’t be added, only modified. I also recommend shorter file for SMS notification. Here are the steps I take:
  1. Trim MP3 files using Audacity (usually SMS notification should be shorter, roughly 3-4 seconds should be good)
  2. Import the MP3 file to iTunes
  3. Change the iTunes import to AIFF (Follow the ringtones guide to change importing mode in iTunes)
  4. Find the AIFF file and copy to desktop
  5. Change the extension to “.caf”
  6. SFTP to the iPhone using Cyberduck (Mac) or WinSCP (Windows) or any other SFTP software
  7. Navigate to the following directory: “/System/Library/Audio/UISounds”
  8. Change one of the “sms-received.caf” file to “sms-received_.caf” where is an integer from 1 to 6 that is least preferrable
    For example: Rename “sms-received6.caf” to “sms-received_6.caf” to replace the Electronic with custom sound
      File name mapping to notification name:
      sms-received1.caf -> Tri-tone
      sms-received2.caf -> Chime.caf
      sms-received3.caf -> Glass
      sms-received4.caf -> Horn
      sms-received5.caf -> Bell
      sms-received6.caf -> Electronic
  9. Upload the file on the desktop using the old name of that was changed
    For example: if “sms-received_6.caf” is changed to “sms-received_6.caf”, upload the file using the name “sms-received6.caf”
  10. Choose in iPhone the replaced tone
    For example: if you replaced sms-received6.caf, then you should choose Electronic
UPDATE: Ringtone should be set to 30 seconds. Another way to trim the music is to use iTunes’ ‘start time’ & ‘stop time’ field. This field is accessible by right clicking the song then choosing Get Info -> Options. After performing that, you export the file as AAC then rename it.
UPDATE: As one commenter mentioned, the SMS Notification hack only works on jailbroken iPhone

Tuesday, January 18, 2011

[Guide to] Update to iOS 4.3 on your iOS Device Without Developer Account

iOS 4.3 beta 1 has been released couple of days ago with new features for both iPad and iPhone. Today, we'll show how to successful method to update your device to iOS 4.3 without a developer account.


Quick Guide on how to "hacktivate" iOS 4.3 without a developer account.

1st Method
1) Install iOS 4.3
2) "Jailbreak" with redsn0w 0.9.6rc8, you should see a white block in de upper left corner from your iPhone, reboot it
3) get iFunBox
4) navigate to "Raw File System" -> /System/Library/CoreServices
5) open SystemVersion.plist and remove the following lines:
ReleaseType
Beta
6) Reboot the iPhone
7) Activate your iPhone with iTunes


2nd Method (thx to joshingknight)
1) Restore to 4.2.1
2) Shift-Update and point the 4.3 IPSW. here’s important that you Shift-Update, not Shift-Restore!
If you want File System Access just jailbreak it like you were on 4.2.1 and reboot your iDevice when it’s stuck on a black screen, then you have FS Access with tools like iFunBox, but Cydia won’t work
Congrats your iPhone is activated now =)


Greetings from Switzerland..


Sourse : xSellize


Download Redsn0w 0.9.6rc8 for Windows
Download Redsn0w 0.9.6rc8 for Mac OS X

Friday, January 7, 2011

[How to] Fix iFile Cocoa error 513

Having error on your iFile when you wanted to edit some files in your iPhone? This kind of permission or so called "Cocoa Error 513" can be fixed simply by using MobileTerminal.


Here's how you can solve it (Step by Step Guide)


  1. Open MobileTerminal
  2. When MobileTerminal starts up, type in su then hit return.
  3. Now type in your password, default password if you did not change it is alpine and hit return
  4. Type in cd /var/stash then hit return.
  5. Now type in your MobileTerminal chmod -R 4755 /Applications/iFile.app or chmod -R 4755 /Applications.pwn/iFile.app and hit return.
  6. Now reboot your iPhone/iTouch/iPad.
After reboot,your iFile should be working properly as it is. Enjoy.
***P/S: Red highlighted/Bold/Italic words is the command you need to type in your MobileTerminal.

Wednesday, January 5, 2011

How to change permission via iFile (with pictures)

Here's how you can change your iFile permission without going through MobileTerminal.


Step 1. Open iFile


Step 2. Goto the location/Dir of the file you wanna change permission


Step 3. Click the little blue arrow near the file, you will see a page like this:


Step 4. Scroll Down, The permission in this screenshot is 644


Step 5. Change permisions; in this screenshot, its 775


Common permissions:

644
User: Read, Write
Group: Read
World: Read

755
User: Read, Write, Execute
Group: Read, Execute
World: Read, Execute

775
User: Read, Write, Execute
Group: Read, Write, Execute
World: Read, Execute

Tuesday, January 4, 2011

[Guide] Boot Your Tethered Jailbroken iPhone, iPod Touch and iPad Using Redsn0w 0.9.6rc7 (Windows & Mac)

Few hours ago, the iPhone Dev-Team has just released Redsn0w 0.9.6rc7 with one click tethered iOS 4.2.1 jailbreak boot support. Now I will show you how to quickly boot your tethered jailbroken iPhone using RedSn0w 0.9.6rc7 for Windows and Mac. Check out the step by step guide after the jump.


For Windows users:


STEP 1: Download Redsn0w 0.9.6rc7 for Windows and the proper firmware for your device then place them in one folder, let's name it "Pwnage" on you desktop (Download links at the end)


STEP 2: Double Click on Redsn0w file to extract it.
STEP 3: Press on Windows icon at the task bar and type "run" then type "cmd" to start Command Prompt on Windows with Administrative privileges.
STEP 4: Input the following command :


  • For devices with the new bootrom:

%homepath%\Desktop\Pwnage\redsn0w_win_0.9.6rc7\redsn0w.exe -j -i %homepath%\Desktop\Pwnage\iPhone3,1_4.2.1_8C148_Restore.ipsw

  • For devices with the old bootrom (iPod 2G, iPhone 3GS): 
%homepath%\Desktop\Pwnage\redsn0w_win_0.9.6rc7\redsn0w.exe -j -o -i %homepath%\Desktop\Pwnage\iPhone2,1_4.2.1_8C148a_Restore.ipsw

 (Important note: modify the name of the folder "Pwnage", and IPSW file as necessary)

STEP 5: RedSn0w will now open, follow the steps to put your iPhone into DFU mode and boot your device in a tethered jailbroken state.


For Mac users:


STEP 1: Download Redsn0w 0.9.6rc7 for Mac and the proper firmware for your device then place them in one folder let's name it "Pwnage" on you desktop (Download links at the end)
STEP 2: Double Click on Redsn0w file to extract it.

STEP 3: Launch Terminal from Applications:Utilities folder


STEP 4: Enter the following command

  • For devices with the new bootrom
open ~/Desktop/Pwnage/redsn0w_mac_0.9.6rc7/redsn0w.app --args -j -i ~/Desktop/Pwnage/iPhone3,1_4.2.1_8C148_Restore.ipsw

  • For devices with the old bootrom (iPod 2G, iPhone 3GS):
open ~/Desktop/Pwnage/redsn0w_mac_0.9.6rc7/redsn0w.app --args -j -o -i ~/Desktop/Pwnage/iPhone2,1_4.2.1_8C148a_Restore.ipsw
(Important note: modify the name of the "Pwnage", and IPSW file as necessary)
STEP 5: RedSn0w will now open, follow the steps to put your iPhone into DFU mode and boot your device in a tethered jailbroken state.

Now you successfully Booted your tethered jailbroken iPhone, iPod touch and iPad with these few simple steps [Thanks iClarified]

Download Redsn0w 0.9.6rc7 for Windows
Download Redsn0w 0.9.6rc7 for Mac