Saturday, February 5, 2011

How to: Jailbreak Untethered iOS 4.2.1 using Greenpois0n.[WIN]

Members of Chronic Dev Team has finally announced the release of the long awaited GreenPois0n RC5 for Windows. This tool brings untethered iOS 4.2.1 jailbreak for all iOS devices. Keep in mind, the software is only available for Mac OS X & Windows. A Linux version will be coming very soon.


Follow the below guide for step by step instructions to convert your tethered jailbreak to untethered jailbreak on iOS 4.2.1:


STEP 1: Your device must be on iOS 4.2.1, then download GreenPois0n RC5 for Mac OS X from here. [Mirror]

STEP 2: Launch GreenPois0n RC5 then connect your iPhone into your Mac via USB and click on Jailbreak as shown below:


STEP 3: Follow the instructions shown on the screen to enter DFU mode:


STEP 4: Once jailbroken, you'll get Cydia installed on your iOS device and you won't need to use Just tethered boot right now option anymore.


That's all.. Enjoy your untethered iOS 4.2.1! Cheers.

Friday, February 4, 2011

[How to] Unlock iPhone 4 on iOS 4.2.1 / 1.59.00 Baseband after Jailbreak with Greenpois0n RC5

Now you can update your iPhone 4 to iOS 4.2.1 with preserving 1.59.00 baseband, which means that you will be able to unlock your iPhone 4 with ultrasn0w 1.2. Let's check out the full step by step guide after the jump


STEP 1: Download TinyUmbrella from here.

STEP 2: Open TinyUmbrella then click on "Start TSS Server"

STEP 3: Open iTunes.

STEP 4: Now, Click on "Restore" NOT "Update"

STEP 5: Now you will get "Error 1013" which means that your baseband has been preserved.

STEP 6: Exit iTunes.

STEP 7: Now you have to jailbreak your iPhone 4 with the Greenpois0n RC5, follow our guide posted here.

STEP 8: Finally you can unlock your iPhone 4 running baseband 1.59.00 using Ultrasn0w 1.2.

Note: this guide is only work with iPhone 4.

How to: Jailbreak Untethered iOS 4.2.1 using Greenpois0n.[OSX]

Members of Chronic Dev Team has finally announced the release of the long awaited GreenPois0n RC5. This tool brings untethered iOS 4.2.1 jailbreak for all iOS devices. Besides you do not need to have '4.2b3' SHSH blobs saved in Cydia, unlike the Redsn0w 0.9.7. Keep in mind, the software is only available for Mac OS X. A Windows version will be coming very soon.


Follow the below guide for step by step instructions to convert your tethered jailbreak to untethered jailbreak on iOS 4.2.1:

STEP 1: Your device must be on iOS 4.2.1, then download GreenPois0n RC5 for Mac OS X from here. [Mirror 1, Mirror 2]

STEP 2: Launch GreenPois0n RC5 then connect your iPhone into your Mac via USB and click on Jailbreak as shown below:

STEP 3: Follow the instructions shown on the screen to enter DFU mode:


STEP 4: Once jailbroken, you'll get Cydia installed on your iOS device and you won't need to use Just tethered boot right now option anymore.


That's all.. Enjoy your untethered iOS 4.2.1! Cheers.

Wednesday, February 2, 2011

How to Put an iPhone Into DFU Mode

DFU means Device Firmware Update. If a restore using Recovery Mode doesn't work you will want to use DFU Mode as a last resort. When placing your iPhone into DFU Mode it does not load the OS before attempting the restore


Watch the Video!
For your convenience this tutorial is available in video format also. Click the Watch It button to view the tutorial!


To put the iPhone into DFU mode so you can do an iTunes firmware restore follow these steps:
Step One
Open iTunes and connect the iPhone to your Mac.


Step Two
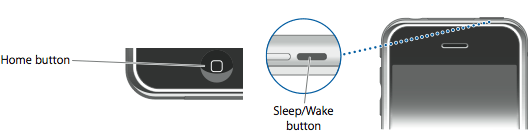
Press and hold the Home button and the Sleep/Wake button at the same time.


Step Three
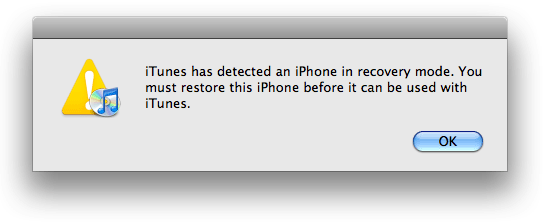
After exactly 10 seconds release the Sleep/Wake button. Continue holding the home button until you iTunes pops up a message telling you that it has detected an iPhone in recovery mode.


The iPhone screen will remain black like this:


NOTE***: It may take a few attempts to get your iPhone into DFU mode. Generally, I hold down both buttons then release the Home button just before I think the Apple logo would appear. If you are still holding both buttons down and you see the Apple logo you are holding them down for too long! 

Friday, January 28, 2011

DeepEnd a jailbreak tweak to make your iPhone goes 3D.

DeepEnd is from a staple in the jailbreak app community, and one of our favorite developers, Ryan Petrich — the same guy behind ActionMenu.


Want to see how DeepEnd works in action? Check out our video inside as we explore this nifty looking jailbreak tweak…


At stock settings, the effect, while present, isn’t as pronounced as one might expect; but that’s nothing a quick adjustment of the Zoom, Pitch, and Roll in the settings section of the Settings.app won’t remedy.


All in all, DeepEnd is a pretty good jailbreak tweak; it does exactly what it says it does, and on top of that it’s free on Cydia for jailbroken iPhones on Ryan’s repo. Just add: http://rpetri.ch/repo/ to your ‘Sources’ in Cydia via the ‘Manage’ tab. iPhone 4 only.

Monday, January 24, 2011

[How to] Get Cydia ThemeIt ( Cydia New Theme Store)

Cydia added a new feature yesterday to bring Theme Center which includes all popular themes for your iPhone but Today Theme It is available as a Cydia package for jailbroken iOS device. Theme It comes with a clean, easy-to-use interface and quite few themes. Let's see how to install it.


STEP 1: You need a jailbroken device to perform this guide, you can use our guide posted here to jailbreak your iOS 4.2.1 device using Redsn0w.


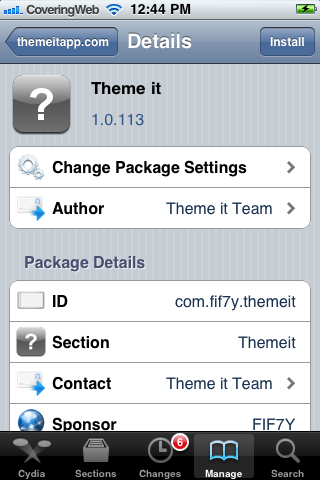
STEP 2: Open Cydia, tap on Manage, then Source, edit and add the below repository source as shown in the screenshot below:


http://www.themeitapp.com/repo


STEP 3: Return back, navigate to the source and install Theme It app as shown below:


STEP 4: That's it, now you'll get Theme It on your home screen, launch it and have fun !


[How to] Put Custom Ringtone and SMS Notification into your iPhone

Following up on the earlier iPhone hacks is customizing the most common audio: ringtone and SMS notification. Apple has locked down custom ringtones and profit from them. The biggest problem is, their selection is scarce and sucks. Here’s a simple guide on how to upload the Ringtones:
  1. Choose an MP3 file and trim it to 30 seconds or less – I use Audacity (download link) to do it
  2. Import that MP3 into iTunes
  3. Goto iTunes -> Preferences (for Mac) or Edit -> Preferences (for PC)
  4. Navigate to Advanced -> Importing tab and set the “Import Using:” to AAC
  5. Find the trimmed MP3 file inside iTunes, right click and choose “Convert Selection to AAC”
  6. Right click the AAC version of the file and choose “Get Info”
  7. Note the path to the file as indicated by the “Where” section under the “Summary” tab
  8. Navigate to the location of the file and copy it to desktop
  9. Change the extension of the copied file to “.m4r”
  10. Open the files in iTunes and it should be automatically inserted under Ringtones category, which then can be transferred to iPhone
NOTE: I have tried to use “SoundConverter” and set the file type to be m4a. This actually doesn’t work. When I did it that way, the file will be uploaded but won’t be able to be played. It might have something to do with the file size generated by “SoundConverter” being too large.
SMS Notification is slightly more complicated than the Ringtones counterpart. SMS notification actually can’t be added, only modified. I also recommend shorter file for SMS notification. Here are the steps I take:
  1. Trim MP3 files using Audacity (usually SMS notification should be shorter, roughly 3-4 seconds should be good)
  2. Import the MP3 file to iTunes
  3. Change the iTunes import to AIFF (Follow the ringtones guide to change importing mode in iTunes)
  4. Find the AIFF file and copy to desktop
  5. Change the extension to “.caf”
  6. SFTP to the iPhone using Cyberduck (Mac) or WinSCP (Windows) or any other SFTP software
  7. Navigate to the following directory: “/System/Library/Audio/UISounds”
  8. Change one of the “sms-received.caf” file to “sms-received_.caf” where is an integer from 1 to 6 that is least preferrable
    For example: Rename “sms-received6.caf” to “sms-received_6.caf” to replace the Electronic with custom sound
      File name mapping to notification name:
      sms-received1.caf -> Tri-tone
      sms-received2.caf -> Chime.caf
      sms-received3.caf -> Glass
      sms-received4.caf -> Horn
      sms-received5.caf -> Bell
      sms-received6.caf -> Electronic
  9. Upload the file on the desktop using the old name of that was changed
    For example: if “sms-received_6.caf” is changed to “sms-received_6.caf”, upload the file using the name “sms-received6.caf”
  10. Choose in iPhone the replaced tone
    For example: if you replaced sms-received6.caf, then you should choose Electronic
UPDATE: Ringtone should be set to 30 seconds. Another way to trim the music is to use iTunes’ ‘start time’ & ‘stop time’ field. This field is accessible by right clicking the song then choosing Get Info -> Options. After performing that, you export the file as AAC then rename it.
UPDATE: As one commenter mentioned, the SMS Notification hack only works on jailbroken iPhone